Faded Trail: Difference between revisions
No edit summary |
No edit summary |
||
| Line 80: | Line 80: | ||
{| class="wikitable" | {| class="wikitable" | ||
{{ItemSpawnHeader | title=Main Spawn Pool}} | {{ItemSpawnHeader | title=Main Spawn Pool}} | ||
{{ItemSpawnRow | item=Leppa Berry | start_floor=1 | end_floor= | {{ItemSpawnRow | item=Leppa Berry | start_floor=1 | end_floor=7}} | ||
{{ItemSpawnRow | item=Oran Berry | start_floor=1 | end_floor= | {{ItemSpawnRow | item=Oran Berry | start_floor=1 | end_floor=7}} | ||
{{ItemSpawnRow | item=Apple | start_floor=1 | end_floor= | {{ItemSpawnRow | item=Apple | start_floor=1 | end_floor=7}} | ||
{{ItemSpawnRow | item=Lum Berry | start_floor=1 | end_floor= | {{ItemSpawnRow | item=Lum Berry | start_floor=1 | end_floor=7}} | ||
{{ItemSpawnRow | item=Reviver Seed | start_floor=1 | end_floor= | {{ItemSpawnRow | item=Reviver Seed | start_floor=1 | end_floor=7}} | ||
{{ItemSpawnRow | item=Blast Seed | start_floor=1 | end_floor= | {{ItemSpawnRow | item=Blast Seed | start_floor=1 | end_floor=7}} | ||
{{ItemSpawnRow | item= | {{ItemSpawnRow | item=Warp Seed | start_floor=1 | end_floor=7}} | ||
{{ItemSpawnRow | item= | {{ItemSpawnRow | item=Sleep Seed | start_floor=1 | end_floor=7}} | ||
{{ItemSpawnRow | item= | {{ItemSpawnRow | item=Stick (3) | start_floor=1 | end_floor=7}} | ||
|} | {{ItemSpawnRow | item=Whirlwind Wand (2) | start_floor=1 | end_floor=7}} | ||
{{ItemSpawnRow | item=Pounce Wand (3) | start_floor=1 | end_floor=7}} | |||
=== | {{ItemSpawnRow | item=Warp Wand (1) | start_floor=1 | end_floor=7}} | ||
{{ItemSpawnRow | item=Lob Wand (2) | start_floor=1 | end_floor=7}} | |||
{| | {{ItemSpawnRow | item=Geo Pebble (2) | start_floor=1 | end_floor=7}} | ||
{{ | {{ItemSpawnRow | item=Rebound Orb | start_floor=1 | end_floor=7}} | ||
{{ | {{ItemSpawnRow | item=All Protect Orb | start_floor=1 | end_floor=7}} | ||
{{ | {{ItemSpawnRow | item=Luminous Orb | start_floor=1 | end_floor=7}} | ||
{{ | {{ItemSpawnRow | item=Mirror Orb | start_floor=1 | end_floor=7}} | ||
{{ | {{ItemSpawnRow | item=Power Band | start_floor=1 | end_floor=7}} | ||
{{ | {{ItemSpawnRow | item=Special Band | start_floor=1 | end_floor=7}} | ||
{{ItemSpawnRow | item=Defense Scarf | start_floor=1 | end_floor=7}} | |||
{{ItemSpawnRow | item=Blue Apricorn | start_floor=1 | end_floor=7}} | |||
{{ItemSpawnRow | item=Green Apricorn | start_floor=1 | end_floor=7}} | |||
{{ItemSpawnRow | item=White Apricorn | start_floor=1 | end_floor=7}} | |||
{{ItemSpawnRow | item=Red Apricorn | start_floor=1 | end_floor=7}} | |||
{{ItemSpawnRow | item=Yellow Apricorn | start_floor=1 | end_floor=7}} | |||
{{ItemSpawnRow | item=Key | start_floor=1 | end_floor=7}} | |||
|} | |} | ||
== Traps == | == Traps == | ||
This dungeon features no traps. | This dungeon features no traps. | ||
Revision as of 00:31, 29 August 2023
| Zone ID | faded_trail
|
|---|---|
| Prerequisites | Reach Forest Camp |
| Floors | 7 |
| Darkness | No |
| Main type | None |
| Tileset | Tiny Meadow |
| Music | "O, Forgotten Road ~ Faded Trail" |
| Allowances | |
| Items | No restriction |
| Starting level | Current |
| Team size | 4 |
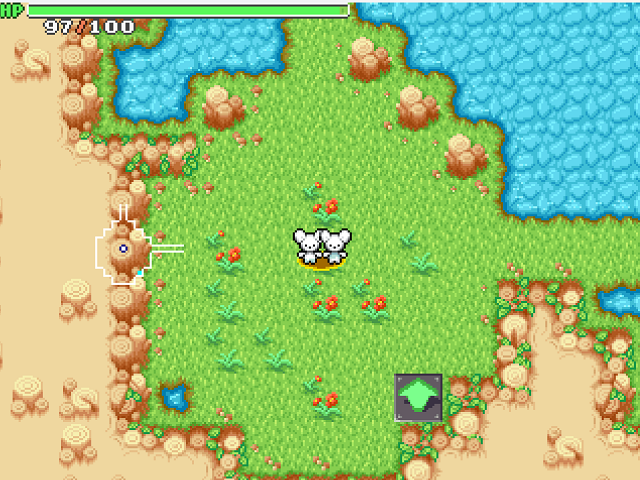
Faded Trail is a dungeon in PMDO accessible from Forest Camp. This is one of the two standard dungeons initially accessible from Forest Camp, the other being Bramble Woods.
Exploration
Floors 1-4 of this dungeon have a 4x3 grid layout using Cross and Round room types. Floors 5-7 of this dungeon have a 4x3 Beetle layout with all rooms being Bump type. Water is present on all floors.
A hidden Secret Stairs tile will always spawn on in a Vault, triggered by a Switch Tile 5F. This will take the player to a side dungeon called Hidden Trail.
Completing Faded Trail will take the player to Cliff Camp. Completing Hidden Trail will unlock Faultline Ridge take the player to Base Camp.
Pokémon
Floors 5-7 will always spawn exactly two Starly each floor.
| Pokémon | Level | Floors | Ability | Moves | Notes | |
|---|---|---|---|---|---|---|
| Sentret | Lv. 5 | 1–4F | Random | Scratch Defense Curl |
||
| Shinx | Lv. 5 (1-4), 7 (5-7) | 1–7F | Random | Tackle Leer |
||
| Starly | Lv. 6 (1-4), 7 (5-7) | 1–7F | Random | Tackle Growl |
||
| Aipom | Lv. 8 | 1–7F | Random | Scratch Sand Attack |
||
| Vulpix | Lv. 10 | 5–7F | Random | Ember | ||
| Tangela | Lv. 10 | 5–7F | Random | Vine Whip | ||
| Poliwag | Lv. 8 | 5–7F | Random | Water Gun | ||
Items
Main Dungeon
| Floors | Item |
|---|---|
| 1–7F | |
| 1–7F | |
| 1–7F | |
| 1–7F | |
| 1–7F | |
| 1–7F | |
| 1–7F | |
| 1–7F | |
| 1–7F | Stick (3)/Data |
| 1–7F | Whirlwind Wand (2)/Data |
| 1–7F | Pounce Wand (3)/Data |
| 1–7F | Warp Wand (1)/Data |
| 1–7F | Lob Wand (2)/Data |
| 1–7F | Geo Pebble (2)/Data |
| 1–7F | |
| 1–7F | |
| 1–7F | |
| 1–7F | |
| 1–7F | |
| 1–7F | |
| 1–7F | |
| 1–7F | |
| 1–7F | |
| 1–7F | |
| 1–7F | |
| 1–7F | |
| 1–7F |
Traps
This dungeon features no traps.
